When moving to Canada, you’ll likely take some personal belongings with you. However, it’s a good idea to plan what you want to bring with you and how much it will cost. When bringing your goods to follow and other household items to Canada, it’s important to know what you can bring in, and what items are restricted or prohibited. You need to ensure that you follow the Canada Border Services Agency (CBSA) guidelines. There are some fine lines you should be cautious of crossing when you bring your goods and properties to Canada. To help you plan, we’ve outlined guidelines to consider along with the process to follow and forms to complete.
Canada Border Services Agency (CBSA) Guidelines
The CBSA provides clear guidelines on what items you can bring to Canada duty-free and what items you will have to pay a duty for. A duty is a fee that you must pay on goods that you bring to Canada. Here we discuss the CBSA guidelines and how to record goods that you will:
Advertisement:
Carry with you, and
Ship at a later date as goods to follow.
Canada allows you to import your goods from your home country duty-free only one time. However, you may have to pay duty for products that you haven’t yet used. There are different criteria for settlers and tourists. In some cases, the Border Services Agent might require you to post a refundable security deposit. This is not heavily enforced and is mostly at the discretion of the border services agent. Click here to visit the CBSA site and view general guidelines.
Itemizing Your Valuables to Move to Canada
Advertisement:
When you know what valuables you want to move to Canada, it’s a good idea to write two separate lists to itemize:
Goods that you will carry with you, and
Goods to follow.
List One: Goods You are Carrying with You
This will include the goods you will carry when you land. For example:
Suitcases: 2 (approximate value of contents)
Carry-on bag: 1 (approximate value of contents)
Mobile phone: 1 (with the make, model, serial number, value)
Advertisement:
Laptop computer: 1 (with the make, model, serial number, value)
Engagement ring and wedding band (value).
List Two: Goods to Follow
This list includes your possessions that will arrive at a later date. It should provide the name of the items along with a description including the:
Value (in Canadian dollars)
Make, model and serial numbers.
TIP: Include pictures where possible of the goods that you are carrying such as jewelry or heirlooms. While it’s not mandatory to provide pictures, it will make it easier and faster to declare your goods. It also helps the Border Services Agent to cross-reference your goods.
It’s a good idea to make at least two copies of your lists so you can give one copy to the agent at the port of entry and keep one for yourself.
To create your goods to follow list, you can simply group related items together using categories. For instance, you can have a clothing and linen category where you list all the related items and then do the same for other categories such as books, furnishings, jewellery, appliances, etc. This will save you and the Border Services Agents’ time and ensure you can easily locate your things when they arrive.
TIP: To help you stay organized, use one page for each category. That way you can simply add items that you may have missed to the relevant page.
You can provide a total value for the items listed in each category. However, you may want to be more specific with items of high value such as jewellery, artwork, silverware, or other expensive belongings.
Goods to Follow: Antique Silverware
If you decide to use an international shipping company they will have their own list as well. You must sign and date the list. You can find a list of international movers that work in Canada here.
Items You Can Bring Duty-Free
Canada allows a one-time duty-free import for all your household goods. In instances where a resident that has used the waiver moves out of Canada and decides to move back, they will not be eligible for a duty-free waiver on goods they return with. The waiver doesn’t include those items that you’re yet to use as they will be considered as new items and you will have to pay duty on those items.
If you have married within three months before moving to Canada or will marry within three months after you arrive in Canada you will not have to pay duties on your wedding gifts.
According to the CBSA, you can bring the following goods duty and tax-free:
Clothing and linens
Private coin, stamp, and art collections
Utility trailers
Furniture
Personal computers
Motor homes
Furnishings
Books
Private aircraft
Appliances
Musical instruments
Tool sheds (that do not attach to or form part of a dwelling
Silverware
Hobby tools and other hobby items
Family heirlooms
Jewellery
Personal vehicles
Mobile trailers
Antiques
Pleasure boats and the trailers to carry them
Items Exempt from Duty (one-time only)
Be sure to check out the CBSA site for other specifications that apply to jewellery, wedding gifts, and value limitations. For example, for personal and household items that are worth more than CAN$10,000, you must pay duty and taxes on the amount over CAN$10,000.
Items You Have to Pay Duty
For a vast majority of work tools and equipment, you will have to pay duty when you bring them to Canada. If you’re in doubt about items you are bringing with you, be sure to bring the receipt on your trip.
You will be required to pay duties for most items on this list:
farm equipment
equipment you plan to use in:
contracting
construction
manufacturing
vehicles you plan to use for business
items you have bought on your way to Canada
items you have leased or rented (as these are not items that you own).
Goods that are Restricted and Prohibited
There are some goods and items that you cannot bring to Canada. So it’s helpful to know what items are restricted before you arrive. If you bring restricted items, CBSA can seize the items, and you may have to pay penalities, or you may even be prosecuted. You can learn more details about some of the restricted items in the links below:
Forms to Declare Goods to Carry and Goods to Follow
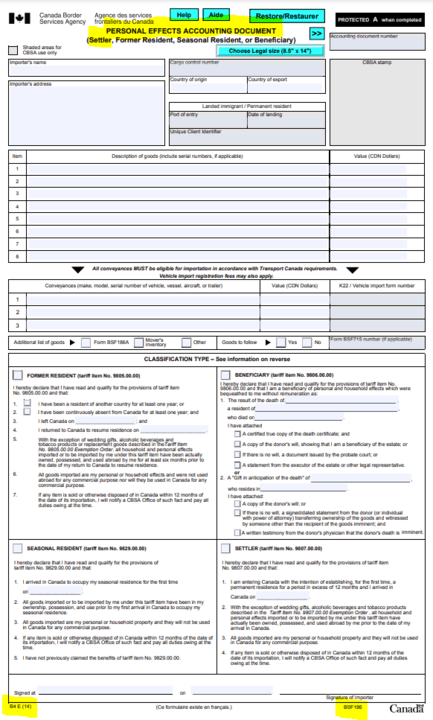
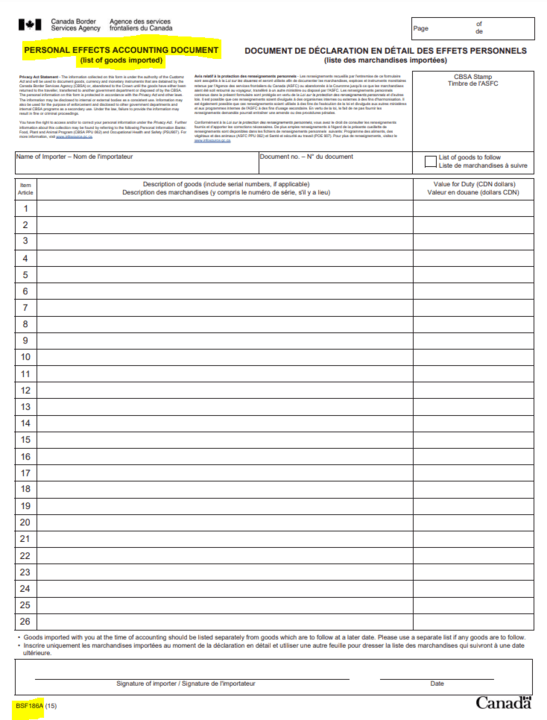
A key part of declaring your belongings are these two important forms: BSF186 and BSF186A (also known ad Settler’s Effect Lists.) These forms account for all of your personal belongings that you are bringing to Canada. To save time at the border, you can fill these forms before you arrive in Canada.
You will use Form BSF186 (also known as Form B4) to keep track of the items you are bringing to Canada at the time of entry. You can complete Form BSF186 before you arrive in Canada. This list will help the border officer determine if you have to pay a duty tax on any of the items you are carrying.
Use this form to:
List any items that you owned before moving to Canada that you intend to carry
Present at the first port of entry to a CBSA officer.
The BSF186A Form (also known as form B4A) is basically your “goods to follow” list to show what goods will arrive in Canada at a later date. It’s important to complete this form so that you don’t pay a duty tax on any of your belongings that you are shipping. Without this form, you will have to pay duty on items that arrive at a later date.
Your list may be several pages long. So to stay organized, use one page per category
You can also use this list for insurance purposes in case of loss or damage to your goods.
Use this form to:
List all of your belongings that you are shipping to Canada
Show the value of your items in Canadian dollars ($CAD).
Listing an item on your Goods to Follow list allows you the right to ship it to Canada, duty-free at any time in the future. However, when hen a customs officer stamps your Goods to Follow list, you cannot add anything to the list.
TIP: Have two copies of both forms. One for the CBSA officer, and one for your records. The CBSA officer will stamp, sign, and assign a file number. Keep the copy of the BSF186A to retrieve your goods to follow when they arrive in Canada.
Claiming Your Goods to Follow
When your goods to follow arrive in Canada, the moving company will notify you. Then you must go to a customs depot and present the original BSF186A to the Canada border services officer. Customs will cross-check your copy of the signed form with theirs to ensure all items are the same. When this is done, you can arrange for the moving company to deliver your belongings to your residence.
The CBSA guidelines can inform you about what you can bring to Canada without paying duty. With this information, you’ll also know what you can bring with you and items that are restricted. This will help you to save money, and avoid bringing any items that are not allowed into Canada.
10 Tips for Shipping Personal Effects
Choosing what personal items to bring, packing them up, and then shipping them safely can seem overwhelming. Where do you begin? Here are 10 things to consider.
1. Bring nostalgic items that are important to you emotionally (i.e., family photos, heirlooms, etc.).
2. Bring items that will be cheaper to ship than to buy new (i.e., furnishings).
3. Leave items that you can replace with new versions in Canada (i.e., appliances, electronics, and items more expensive to ship than to buy new).
4. If your household packing is done by professional movers, they will itemize and label your belongings, making it much easier to unpack at the other end. Ensure that the movers provide you with a detailed packing list as well. If you pack yourself, follow the same method.
5. Check if your freight forwarding company offers shipping only, or if it includes an unpacking service.
6. Ensure you have insurance against loss or damage of your possessions while in transit.
7. Ensure you have the shipping company’s contact details and they have yours.
8. Get recommendations from friends and relatives to find a reliable mover.
9. Bring necessities from home with you on the plane. A word of advice about packing the little things: as it could be some time before you will be in a position to buy day-to-day essential items you need.
10. When your personal effects arrive, you will be required to appear at the Canada Border Services Agency (CBSA) office to collect them. This is a simple procedure; if your papers are in order, there should be no delay.
For more information, tools, and free webinars about living in Canada visit our Settling in Canada resource page. We’ll help you to settle in Canada successfully!
Frequently Asked Questions
What should I keep in mind with regard to what goods to carry?
Goods to Carry: As a landed immigrant, you are entitled to bring with you, free of duty and taxes, personal and household effects that you own and possess before you arrive in Canada. These may include furniture, furnishings, silverware, linen, books, musical instruments, family heirlooms, paintings etc.
Wherever possible, you should retain the receipts of such goods to prove that they are your personal items and for your personal use. Any valuable jewellery, watches, heirlooms and artwork must be assessed before you arrive.
Canada has complex requirements, restrictions and limits for the importation of meat, eggs, dairy products, honey, fresh fruits and vegetables and other food from around the world. You can avoid problems by not bringing these kinds of goods into Canada.
A wide variety of food is available in Canada, including foods sourced from international markets.
Is there a limit on the amount of personal jewellery that I can bring to Canada?
This is based on the declaration you made when you applied for immigration. You can bring in what you had declared duty-free.
Officers may ask you questions about these items during your customs interview. Make sure you describe these items on your list of goods. To avoid delays at customs when you enter Canada:
On your list of goods, use the wording from your insurance policy or jeweller’s appraisal.
Have photographs of the items. Know how much you paid for the items or have a receipt showing how much you paid. You do not need to pay duty or tax on family heirlooms.
Do I have to ship my “goods to follow” in one shipment?
You can ship your goods to follow in several shipments over a period of time without having to pay duty. However, you must record the items on the “goods to follow” list that the Canada Border Services Agency will stamp when you land in Canada.
Is there a time limit on Goods to Follow?
There is no time limit to import items on your goods to follow list, free of duties and taxes. As long as you include the items on your list, you can ship them over time years and even decades later. Even if you’re unsure about whether or not you want to ship something, it’s a good idea to include it on your list. You do not have to ship everything that’s on you list.
Brand Storyteller at magicbywords.com, Business Consultant. Dolapo resides in Nigeria and will be attending Centennial College in Toronto, Ontario as a graduate student. He is currently working with SMEs to help fast-track profitability and sustainability via Inspired Innovation Labs.
Do you know how to find your NOC? The truth is most people don’t even consider it when looking for employment – immigrants and native Canadians alike. But if you find your NOC, it can be a valuable resource to help you during your job search.
According to the Immigration, Refugees and Citizenship Canada (IRCC), Canada welcomed 184,000 new immigrants in 2020 alone. That’s a significant number when you consider that the majority of travel was halted due to COVID-19.
Advertisement:
Immigrants are drawn to Canada for many reasons, and if you’re seeking a higher quality of life and access to job opportunities, understanding the Canadian labour market is vital. Find your NOC and use it as a helpful tool along your immigration journey.
What is a NOC?
The National Occupational Classification (NOC) tool can help you identify in-demand jobs
Advertisement:
One important tool to research the Canadian job market is the National Occupational Classification (NOC) Code. This is the government’s system to describe occupations in Canada. It is basically a classification system for each job in the marketplace with a unique identification code. The NOC can help you to identify the most in-demand sectors, understand the job market, and fast-track your job prospects.
When you find your NOC you can use it as a powerful tool to:
Enhance job security and stability in Canada in the long run
How to Find Your NOC
Identifying your NOC is a simple process. You can click here to find your NOC and use your current job title in the filter items box.
Alternatively, you can find it by visiting the NOC page directly here. You can either search using a four-digit code or by using your job title in the search box.
Please note that your job duties must match the ones that you currently do, especially in cases where your occupation is called something different in Canada. When you find your occupation, write down your NOC code.
Advertisement:
If you can’t find your NOC, you can use the NOC website to search for the closest options on the list with duties that match yours. Then note down the codes and the applicable skill level.
The NOC is used to classify applicants under 10 Broad Occupational Categories (BOC) dependent on skill types. A four-digit code identifies each occupation, otherwise called a unit group. The numbers 0 – 9 represent the first of four digits in the NOC code Canada.
Using the outline below, you can identify your BOC:
0 – Management occupations
1 – Business, finance, and administration occupations
2 – Natural and applied sciences and related occupations
3 – Health occupations
4 – Occupations in education, law and social, community and government services
5 – Occupations in art, culture, recreation, and sport
6 – Sales and service occupations
7 – Trades, transport and equipment operators and related occupations
8 – Natural resources, agriculture, and related production occupations
9 – Occupations in manufacturing and utilities
Learn more about how to find your NOC category here.
For example: NOC Code 00
The first digit represents the skill type: Management occupation
The second digit represents the management level: Senior Management.
NOC Skill Level
Individuals can move from one skill level to another and possibly target available vacancies, either through additional training or further education. Click here to find your skill level.
Skill Level (A – D)
Skill Level (0 – 7)
Education or Training
A – Occupations require university education
0 or 1
University degree at the bachelor’s, master’s, or doctorate level.
B – Occupations require college education, specialized training or apprenticeship training.
2 or 3
Two to three years of post-secondary education at a community college, institute of technology, or CEGEP, or
Two to five years of apprenticeship training or
Occupations with supervisory responsibilities and with significant health & safety responsibilities, such as firefighters, police officers, and registered nursing assistants are all skill level B.
C – Occupations require secondary school and/or occupation-specific training.
4 or 5
Some secondary school education, with up to two years of on-the-job training, training courses, or specific work experience.
D – On-the-job training is provided for occupations.
6 or 7
Short work demonstration or on-the-job training or
No formal educational requirements.
NOC Skill Level: Type of and amount of training you need to work in an occupation.
Applying for Permanent Residence through Express Entry?
If you’re applying for Express Entry, you must be ranked in the Skill Type 0, levels A or B. This applies to the following Express Entry programs:
Each NOC has unique advantages. You do not have to be at the highest NOC level to successfully gain an advantage.
For example, there are provinces that only target people in certain NOC code Canada classes. The province of Nova Scotia, for instance, targets applicants based on its occupation in demand list, in 2021, one requirement was for applicants with NOC 3143 (Nurses and Patient Service Associates) and NOC 7511 (Transport Truck Drivers).
What’s Next After You Find Your NOC?
After you find your NOC, you can apply to the immigration program that you are eligible for. And using the NOC can be your biggest asset. When used correctly it can help you to work in Canada faster.
The Canadian government plans to accept 400,000 immigrants in 2021/2022, most of the opportunities will go to those applying to areas where there is a shortage. Some of the most in-demand jobs in Canada include:
For information, tools, free webinars, and more visit our finding a job in Canada resource page. Get the help you need to achieve your career goals in Canada!
Brand Storyteller at magicbywords.com, Business Consultant. Dolapo resides in Nigeria and will be attending Centennial College in Toronto, Ontario as a graduate student. He is currently working with SMEs to help fast-track profitability and sustainability via Inspired Innovation Labs.
Express Entry Canada is easily the most popular route to immigrate to Canada. In the draw for June 2021, there were more than 160,000 applicants in the Express Entry pool. And, the government plans to welcome 400,000 new immigrants. A majority of those will enter through the economic class programs among which is Express Entry.
You can qualify for express entry based on a points-based selection process. Immigration, Refugees and Citizenship Canada (IRCC) award points based on important factors for Canada. For example, the program addresses labour shortages in Canada. It does this by providing a steady stream of qualified candidates who are most likely to succeed in Canada, at least economically. Candidates are placed in an Express Entry Pool and the most qualified (based on points) are invited to apply for Permanent Residence (PR).
Advertisement:
How to Get Express Entry Points
Candidates in the express entry pool are ranked on a points-based system called the Comprehensive Ranking System. You get points for things such as:
level of education
work experience
language competency and those of your spouse.
Advertisement:
You can also get more points if you:
have a valid job offer
were educated in Canada
have family who are citizens or permanent residents, or
The total number of possible points is 1,200. Use this free tool to calculate your total points before you enter the pool.
Successful candidates (and their family members) will address critical labour and demographic gaps and:
contribute to Canada’s economy
get PR with a chance to apply for citizenship
get the chance to settle in one of the world’s most beautiful countries.
What are the Benefits of Express Entry Canada?
The Express Entry Canada program offers many benefits that include:
Speed: It is truly express and applications can be quickly processed within six months or less.
Advertisement:
Job Offer: You do not require a job offer, although it can help when applying for express entry. Many people get into Canada and register with the Canada job bank.
PR: When you apply through Express Entry Canada, you get Permanent Residency. And, you can settle in any province of your choice if you were not nominated under the provincial programs. Also, you and your dependents get to enjoy Canadian healthcare, education, and other benefits that the government provides.
As with most things that have advantages, there are some drawbacks. This program is based on the number of points you receive. But, great candidates do not always get invited to apply for PR for many reasons. For example:
Age: Candidates age 45 and above do not get any points for their age.
Marital Status: Married candidates get more points for their spouse’squalifications even if they’re the ones applying. But, single people don’t get this benefit.
Points and Date: If multiple people have the same total points, the system selects applicants based on the date and time they submitted a profile.
Documents You Require to Apply for Express Entry
To apply for express entry, you need to provide the following documents:
Tip! Even if your first language is English, you can get up to 50 points by showing a strong proficiency in French.
Educational Credential Assessment: You get points for your education. But if you studied outside Canada, you have to prove that your education is valid and equal to a Canadian program. Any of these organizations can evaluate your credentials. You will require this if you apply through the Federal Skilled Worker express entry route.
Provincial Nomination: If you have been nominated by a province or a territory and have a certificate, you get 600 points. You can get nominated based on your education, work experience or provincial needs.
skilled job listed under the skill type 0, with skill levels A, or B.
Most job offers will need a positive Labour Market Impact Assessment (LMIA). The LMIA shows that no Canadian or PR can do said job. Find a list of jobs that are LMIA exempt here.
Invitation to Apply (ITA)
If you are invited to apply for PR from the pool, you need to create your profile and submit these documents:
Police Certificates: For you and every member of your family over 18. But if you have a criminal record you may not be able to enter Canada.
Medical Exams: To show the state of your health (and that of your family members).
Proof of Funds: The amount depends on the size of your family. But if you’re applying under the Canadian experience class or you have a valid job offer, you are exempt from this.
Birth Certificate: If you declare dependent children.
Marriage Certificate: If you declare that you’re married.
Divorce Certificate and Legal Separation Agreement: If you’re divorced.
Death Certificate: If you’re widowed.
Adoption Certificate: If any of your dependent children are adopted.
Use of a representative form: If you hire a representative.
Common-Law Union Form: If you declare a common-law relationship.
Other Documents You May Require
If you have to provide other documents you will see them in your checklist. Some examples include:
Proof of relationship to a Canadian or a PR
Digital photos to confirm your identity
Other names to confirm name changes and aliases
Other documents that support your case for PR.
How Do I Apply for Express Entry Canada Program?
Have you made up your mind about applying to immigrate to Canada? If so, then there are three more steps before you’re on your way. Let’s get into them below:
You need to find out if you’re eligible to apply for the express entry program and answer questions about your nationality, age, and other criteria. Find out if you are eligible here.
When done, you will get a personal reference code. Keep this code because you will need it when you fill in your profile.
2. Fill out an Express Entry Profile
If you are eligible, you can fill out an express entry profile. To do this you need to create or sign in to an account. You will also need information from your application documents (see above) and your NOC job title and code.
Once you create your profile, it is valid for 60 days. After 60 days, you’ll need to create another profile again. After you submit your profile, IRCC will recommend you to your appropriate immigration program.
Once you’re in the pool, be sure that your documents are valid and ready. You will only have 90 days to submit once are invited to apply. You can also do things to increase your points. For example, you can:
get a job
get a provincial nomination, or
improve your language score.
Increasing your points is important because the candidates who rank the highest get picked first. Also, be sure to update your profile if any of your information changes. Every two weeks, the highest-ranking candidates are invited to apply for PR based on the instructions of that round, such as the:
IRCC will notify you if you are invited to apply for PR. IRCC will also tell you the next steps to follow and what program you can apply for. Then you can provide documents in your express entry profile.
Do not provide false information. Doing so can prevent you from being admitted to Canada. In addition, your application may be refused, and you may even be banned from entering Canada for five years.
Pay all fees: such as processing fees, right of permanent residence fees, and biometrics fees.
Submit your application: You might also need to provide your biometrics. But you may not need to do this if you have provided them within the past 10 years. Find a biometrics collection center closest to you here.
Use this web form if you have new information to add to your application afer you have submitted it.
The express entry program clearly offers many benefits to Canada and to those looking to potential applicants. So if you’re eligible, this could be your chance to achieve your dream to immigrate to Canada.
For more information, tools, and free webinars about living in Canada visit our Settling in Canada resource page. We’ll help you to settle in Canada successfully!
Brand Storyteller at magicbywords.com, Business Consultant. Dolapo resides in Nigeria and will be attending Centennial College in Toronto, Ontario as a graduate student. He is currently working with SMEs to help fast-track profitability and sustainability via Inspired Innovation Labs.
The self-employment visa is one of the most flexible working visas in the world. More people will benefit from applying to Canada through this route and take advantage of the benefits it offers. This new program allows immigrants to work in Canada for up to two years and sponsor others to do the same. As well, it addresses the growing problem of unemployment and skill shortages in Canada. Find out how to immigrate to Canada with this program.
How the Self-Employment Visa Compares to a Regular Work Permit
Not every self-employed person will be eligible to immigrate to Canada under this visa route. This program is for people who work in a specific area such as Arts, Culture and Sports. For example, people in sports like athletes, coaches, referees, and those who compete in professional sports. And other examples include:
Advertisement:
Painters
Writers
Actors
Graphic designers, and many more.
You can find more information about who can apply here.
Requirements to Apply
Advertisement:
There are five requirements you have to meet before you can apply:
1. Education:
You can receive a maximum of 25 points:
5 points if you completed high school
15 points if you completed a diploma
20 points if you completed a bachelor’s degree.
Different from the other immigration programs, it also considers the number of years of study. For example, to receive points for a bachelor’s degree you must have at least 15 years of study including:
elementary school
high school, and
bachelor’s degree.
2. Experience:
This is the most significant area to qualify. You must have at least two years of experience in the past five years. And importantly, you must meet the work experience requirement at the time you apply and when the decision is made. In other words, you must have ongoing work experience while you apply for the self-employed program.
Advertisement:
You will receive:
20 points if you have a minimum of two years experience in the past five years
35 points if you have five years experience in the past five years.
3. Age:
There is no maximum age limit, however, you’ll get maximum points if you’re between 21-49 years old.
4. Language:
You can receive up to 24 points in English or French proficiency. There is no maximum language requirement to qualify for the self-employment program. However, you must be proficient in English or French to work in your occupation in Canada. And, you must have intermediate-level English proficiency. Language is assessed at the following levels:
Basic
Intermediate
Advanced.
5. Adaptability:
Get points if you studied in Canada
If you have previous study or work experience in Canada, you can receive up to 6 points. If your spouse has completed the language proficiency test in English or French. Points will also be awarded if you have relatives in Canada who are either permanent residents of Canada or Canadian citizens.
SELECTION CRITERIA
MAXIMUM POINTS
Education
25
Experience
35
Age
10
English and/or French ability
24
Adaptability
6
Total: Applicants must score a minimum of 35 points
What’s the Difference Between a Regular Work Permit and a Self-employment Visa?
Canada has several different types of work permits that are based on your:
occupation, and
reason for entering the country.
Applicants can choose between two of the regular work permits:
1. Employer-specific work permit:
This permit will allow you to work in Canada based on conditions such as:
the name of the specific employer or organization you’re allowed to work for
the duration of the employment contract
the locations where you can work (if applicable).
When applying for employer-specific work permits, the employer will have to give you either:
a copy of a Labour Market Impact Assessment, or
an employment contract as it’d be needed in your application.
2. Open work permit:
You can only get an open work permit in specific situations. Applicants with an open work permit can work for any employer in Canada. However, some companies are ineligible because they have failed to comply with conditions.
Is This Program Right for You?
There are perks to applying for your visa through this route. For example some advantages are that applicants don’t:
require a job offer to apply
have conditions on their status
need to set up or purchase a business in Canada before their arrival.
As well, successful applicants are granted Canadian Permanent Residence. The program also has a relatively quick processing time of about 18 to 22 months.
Documents that You Require to Apply
All the documents will open with Adobe Acrobat Reader DC
If applying to the Federal Self-employed Class and claiming points for any selection factors, you must submit these additional documents:
8.Education: Proof of your earned educational credential(s) or full-time (or full-time equivalent) studies
9. Language proficiency test results: Test results can be no older than two years at the time that you apply and must be from one of the designated testing agencies:
10. Relevant experience: Proof of your work experience during the five years before you submit your application (i.e. employment letters, ID cards, etc.)
11. Adaptability: If applicable, submit the following proof of your spouse or common-law partner’s:
earned educational credentials or full-time studies (or full-time equivalent)
studies in Canada under a study permit, if the program was full-time and of at least two years’ duration at a post-secondary institution;
work in Canada under a work permit, if work was full-time and of at least one year
familial relationship to a Canadian citizen or permanent resident living in Canada. The family member must be your parent, grandparent, child, grandchild, sibling, aunt/uncle or niece/nephew, or that of your spouse or common-law partner.
Things to Know Before You Apply for the Self-employment Visa
Have you made up your mind to apply? Here are other things to know:
Where do you apply for this visa?
When you have filled out all the required documents and paid the fees, mail all documents and payment receipt to the following address. Be sure to attach enough postage.
Processing Duration: The average processing time for this visa route is 24 months. However, this will depend on how fast the IRCC is processing applications.
Payments and Fees: The total fees for the program are structured into two parts. The Business Immigration Application ($1,575) and the Right of Permanent Residence Fee ($500)
Spouse/Partner Application Fee: $825
Spouse/Partner RPRF: $500
Dependents: additional $225 per dependent.
Three Steps to Apply for the Self Employed Visa Program
Step 1: Gather the application package: It’s available on the IRCC website. And you’ll get a guide and a document checklist to make sure you meet all the requirements.
Step 2: Pay your application fees. You must pay these fees before you submit your application:
processing fee
right of permanent residence fee (RPRF)
biometrics fee, and
Third-party fees (medical exams, police certificates, and language testing).
Step 3: Submit your application.
You are ready to submit your application when you answer all questions, sign all forms, pay fees, and include supporting documents.
Frequently Asked Questions
What do I need to qualify under the self-employed visa program?
To be eligible you must:
have a minimum of two years of relevant experience
prove that you will be self-employed in Canada, and
Score at least 35 point on the IRCC selection grid.
The points help to determine your prospects to contribute to Canada’s economy.
What do I need to prove self-employed work experience?
1. Business Registration documents such as articles of incorporation or other evidence of business ownership.
2. Evidence of self-employment income.
3. Reference letters from third parties (i.e. clients or vendors) outlining the services that you provided and the payments they made.
4. Translations of all your documents in English or French made by a certified translator must be notarized.
Tip: The more documents, the better. The goal is to ensure that the immigration officers have no doubts as to the nature of your work, competence, and desire to be self-employed in Canada.
Is there a minimum investment required for Federal Self-Employed Immigration?
There is no minimum investment required for this program. The program is unlike Entrepreneur immigration and because this is a self-employment program, you don’t need to set up a corporation or hire employees. You just need to be self-employed.
I have artists or athletes as employees, but I am not an artist or an athlete. Am I eligible for the Federal Self-Employed program?
No. But you might be eligible for Entrepreneur Immigration programs of different provinces. However, you also have to meet the minimum net worth and investment requirements.
How long does it take to immigrate to Canada through the Federal Self-Employed program?
21 months these days. But it has taken several years in the past.
Still want to be your own boss in Canada? The self-employment visa route could be a great option for those who are not qualified for regular work permits.
For more information, tools, free webinars, and more visit our Finding a Job in Canada resource page. Get the help you need to achieve your career goals in Canada!
Brand Storyteller at magicbywords.com, Business Consultant. Dolapo resides in Nigeria and will be attending Centennial College in Toronto, Ontario as a graduate student. He is currently working with SMEs to help fast-track profitability and sustainability via Inspired Innovation Labs.
Startup Visa Canada: innovative entrepreneurs wanted!
One of the routes to permanent residence (PR) in Canada is through the Startup Visa program. This route can be less competitive and simpler than for example the Express Entry program. With a short processing time of about 12 – 16 months, it can take less time to obtain PR than some of the usual and more popular routes. Ideally, this program is for you if you’re an innovative entrepreneur looking to build a business and create jobs in Canada.
I recently came across the refusal and approval data for study permit applications for citizens of different countries looking to come to Canada and I was surprised by the high rates of refusals for some of them. Instantly I was able to deduce two things:
Advertisement:
according to the UN, Canada was a top-level migration destination, I’m finding it still is in the post COVID world, and
there are more people applying to study in Canada than the government has quotas for.
This got me thinking; what visa pathway is more welcoming? One answer that I arrived at is the startup visa since it has had the lowest application rates. Of the 2,750 startup visas earmarked annually since 2013, less than 5,000 visas have been issued in total. In other words, less than 50% of the total available visas have been issued.
Low Application Rates can Provide an Advantage
Advertisement:
One reason for the low demand is the way the program has been advertised, typically with the goal of targeting startups who would rather move to Silicon Valley but might have problems with the US H1B visa. This would have been all fine and good if Canada could compete on all the offerings the US offers. But since it can’t it would mean that those startups would likely choose the US over Canada and that’s not how we see an innovative country, at all.
Ironically, that loophole is favorable to applicants since it means increased access to entrepreneurs looking to move to Canada. It also means that there are some advantages unique to the startup visa applicants get when applying through this route.
There are several benefits that applicants get when they apply for the startup visa program. For example, some of the benefits include:
Over the Points Based Pathways (I.e. Express Entry) you do not get lower points if you’re past a certain age. You can apply for the startup visa program no matter how old or young you are, or whether you’re single or married.
Successful applicants for the Startup visa Canada (and their dependents) will apply for and get PR. This doesn’t change even if a newly launched startup proves unsuccessful. You can still live in Canada for as long as you like. Compare this to other routes like the Study Permit where you have to be on top of your tuition payments for your permit to be valid.
Applicants don’t need to secure funding, or even launch their startups to apply for the Startup Visa Canada. Applicants with bankable startup ideas can apply to one of the designated Business Incubators who will vet the ideas and issue a letter of support. The letter of support will then be presented at their local Canadian embassy where you can then apply for Permanent Residence
Faster Processing Times: Since the Startup Visa route is not as competitive as the other routes, applications can conclude in three months, once an applicant gets a letter of support from a designated organization. Depending on the application route too, applicants may get a letter of support within two months. So most Startup Visa applications can conclude within five months.
The Drawbacks
You’re probably wondering now if this Startup Visa is so great, why don’t more people apply? There are some drawbacks, for example:
The marketing: at the risk of sounding like a broken record, I think one of the major disadvantages of the program is how and to whom it is being targeted. Some of the fastest-growing startups in the world for the past two years have been outside of the US. However, as part of the marketing efforts for the Startup Visa, the Canadian government placed billboards in Silicon Valley. Most people (startups inclusive) in the US think about Canada like the US’ better behaved younger sibling. The thing is, no matter how much better your friends’ younger sibling acts, you’d still see them as different from your friend which will make their positives seem like they’re trying too hard.
The idea: you’re going to hate the Startup visa Canada unless you either have a bankable business idea, a good team, can get up to $75,000 from the designated angel investors or you can get up to $200,000 from one of designated Venture Capital firms. These are the only ways you can get the letter of support that will allow you to apply for Canada PR.
If you’re still reading this post, then it’s safe to say you may want to apply. So, I’ll address the eligibility requirements.
Eligibility Requirements for Startup Visa Canada
To apply for a startup visa, you must meet these requirements:
Have a qualifying business: As a startup visa applicant, you need to have a business that would qualify for a letter of support from one of the designated organizations. A business will qualify if each of the applicants (up to five co-founders) holds more than 10% of the company’s total shares at that time.
Meet the language requirements: You need to meet the minimum Canadian Language Benchmark 5 to be eligible for this category. Applicants that score a minimum of 5 in each of the four testing categories of the IELTS can apply. Your communication skills are important to help your work in Canada.
Get a letter of support from a designated organization: The letter of support shows proof that an investor will support your business idea. The organization you apply to will depend on the:
stage of growth that your business is in, and
industry you operate.
Bring enough money to settle: Depending on the number of family members you are traveling with. You will need to show proof of settlement funds for your first year in Canada. If you’re going with 7 people, for instance, you will require C$34,200 as proof of settlement funds.
How to Apply
Develop a business idea: Some of the organizations have their own templates where you can answer specific questions about your business or idea. Others will request a detailed plan about your proposed activities and your experience
Submit your specific idea or business plan to your selected incubator, angel investor, or venture capital firms: You should look at the track record of the organization you decide to apply to and consider these questions:
Have they supported businesses like yours in the past?
Do they accept entrepreneurs in your growth stage?
Do they take money to submit applications?
This information will inform your pitch and how you approach them. You can also apply to more than one incubator with the same or different ideas.
Get a letter of support: Once your business plan has been approved by your designated organization, the organization will then issue you a letter of support. The duration to secure a letter from an organization is anything from 10 days to four months depending on the organization you are dealing with and their admission cycles.
Fill out the application form: It’s simple, and easy to complete.
Gather all the documents listed in the documents checklist: The documents are all the forms and evidence that you require for your application. These include but are not limited to the application forms for you and your dependents, your previous travel experience, your proof of settlement funds, your language test results, your letter of support, your dependents’ identity documents, and others.
Pay your application fees: and remember to include your payment receipts when you mail your application.
Startup visa Canada is ideal if you’re seeking a less competitive route to move to Canada. With an entrepreneurial spirit, this program is a great way to gain permanent residence and contribute to the Canadian economy.
For more information, tools, free webinars, and more visit our finding a job in Canada resource page. Get the help you need to achieve your career goals in Canada!
Corinna Frattini is the content marketing strategist at Prepare for Canada and contributes articles related to working in Canada. With a background in human resources and leadership development, her articles focus on what Canadian employers seek and how newcomers can continue their careers in Canada.
Brand Storyteller at magicbywords.com, Business Consultant. Dolapo resides in Nigeria and will be attending Centennial College in Toronto, Ontario as a graduate student. He is currently working with SMEs to help fast-track profitability and sustainability via Inspired Innovation Labs.